Have you ever felt like your car’s audio system lacks that oomph, especially when your favorite tunes come on? I’m here to tell you that installing a powered subwoofer in your car is like giving your music wings.
It’s all about that deep, soul-shaking bass that can turn a simple drive into an epic journey. And, believe me, adding a powered subwoofer is a game-changer for your listening experience.
Now, why is a subwoofer so crucial for the car audio enthusiast? It’s simple: a subwoofer’s job is to deliver the low-frequency punch your regular speakers can’t handle.
This means you get to feel every beat as it’s meant to be felt. And when we talk about a powered subwoofer, we’re embracing convenience with an all-in-one solution that brings its amplifier into the mix. The result? Cleaner, more precise, chest-thumping bass.
So, if you’re ready to elevate your car’s audio, stick with me. I’ve got a step-by-step guide that’ll walk you through How to Install Powered Subwoofer in Car with ease.
Whether you’re a DIY beginner or a seasoned pro, you’ll see how rewarding it is to take your car’s sound system to the next level. Let’s get started and transform your daily drive into an immersive audio adventure!
Why Should You Prefer a Powered Sub over a Passive One?

When we dive into car audio, choosing the right type of bass booster – a subwoofer – can make a huge difference. Now, I want you to picture two types of subwoofers: one is called “powered” and the other “passive.” Why should you give a thumbs up to the powered subwoofer for your car? Let me tell you.
Imagine having a box that already has everything you need inside it to make your music sound big and bold. That’s a powered subwoofer.
It’s like a superhero of sound that comes with its powers, which, in this case, is its built-in amplifier. This means it can care for itself, and you don’t need to find an extra amp to make it work. It’s ready to go!
A powered subwoofer is easier to install because it’s all in one. You don’t have to play a matching game, trying to find the suitable amplifier to go with a subwoofer like you would with a passive one.
Plus, it saves space! We all know space is precious in our cars, right? With a powered subwoofer, you can get that toe-tapping, head-nodding bass without taking up too much room.
And here’s something else – powered subwoofers are like a caring friend for your car’s electrical system. They’re designed to use power efficiently, so they don’t ask for more than what your car can give. This means more peace of mind and less stress on your car’s battery.
So, when you’re ready to choose, remember that a powered subwoofer is like a one-stop shop for better bass in your car. It’s all about making your life easier while giving you the sound that turns heads wherever you roll!
How to Install Powered Subwoofer in Car?
Materials and Tools

Before we start our little project of bringing booming bass to your car, we need to gather our tools and materials. It’s like making sure we have all the ingredients ready before we start baking a cake. So, here’s what you’ll need:
- Powered Subwoofer: This is the star of the show, the main box that will make your car’s music come alive with bass.
- Wiring Kit: Think of this as the subwoofer’s lifeline. It connects the subwoofer to the car’s power and audio system.
- Screwdriver Set: These are your handy helpers for opening panels and securing the subwoofer in place.
- Wire Strippers: These little tools are like scissors for wires. They help you strip the insulation off the wires so you can connect them correctly.
- Crimping Tool: This is used to join the metal parts of wires and connectors tightly so they stay together like best friends.
- Panel Removal Tool: It’s like a gentle pry bar that helps you remove the car’s interior panels without scratching them.
- Electrical Tape: You can think of this as a bandage for wires, keeping them safe and covered after you connect them.
- Cable Ties: These are like belts for your wires, keeping them neat so they don’t get in the way.
Gathering these tools and materials is the first step in our journey to better bass. Once you have these ready, we’re ready to move to the next phase: prepping your car for a brand-new sound experience!
Pre-Installation Preparation

Getting ready to install your powered subwoofer is exciting, but just like when you’re about to start a science experiment, safety comes first. We’re going to take some smart steps to make sure everything goes smoothly and safely.
Safety First: Disconnecting the Car Battery
Before we touch anything, we need to disconnect the car battery. This is super important because it prevents any unexpected sparks or electrical issues while we’re working. It’s like turning off the electricity before you fix a light switch.
Here’s what you do: Open your car’s hood, find the battery, and remove the negative cable. It’s usually the black one. Just loosen the little bolt with a wrench and take the cable off the battery terminal.
Picking the Perfect Spot: Choosing the Right Location
Now, let’s find the best home for your new subwoofer. You might think it can go anywhere, but it’s like picking the right seat in a movie theater. You want the best spot for the perfect experience.
In most cars, the trunk is an excellent place for a powered subwoofer, especially if it’s a smaller size. You want to ensure it’s secure and not rolling around like a bowling ball in the trunk. Also, it should be somewhere it won’t get crushed by your groceries or gym bag.
Fit for Your Ride: Car Model Considerations
Not all cars are the same, just like a sneaker that fits you might not fit your friend. So, it’s essential to think about your specific car model. Some cars have more room, and some have special spots for subwoofers.
If you’re unsure, peek at your car’s manual; it’s like a treasure map for your car’s nooks and crannies. Sometimes, you can even find special kits for your car model that help your subwoofer fit perfectly.
Remember, the time we spend preparing is just as important as the installation itself. It’s all about making sure the subwoofer not only sounds good but is also safe and snug in its new home. Once you’ve got these steps down, you’re ready to move on to the exciting part: the installation!
Wiring and Connections
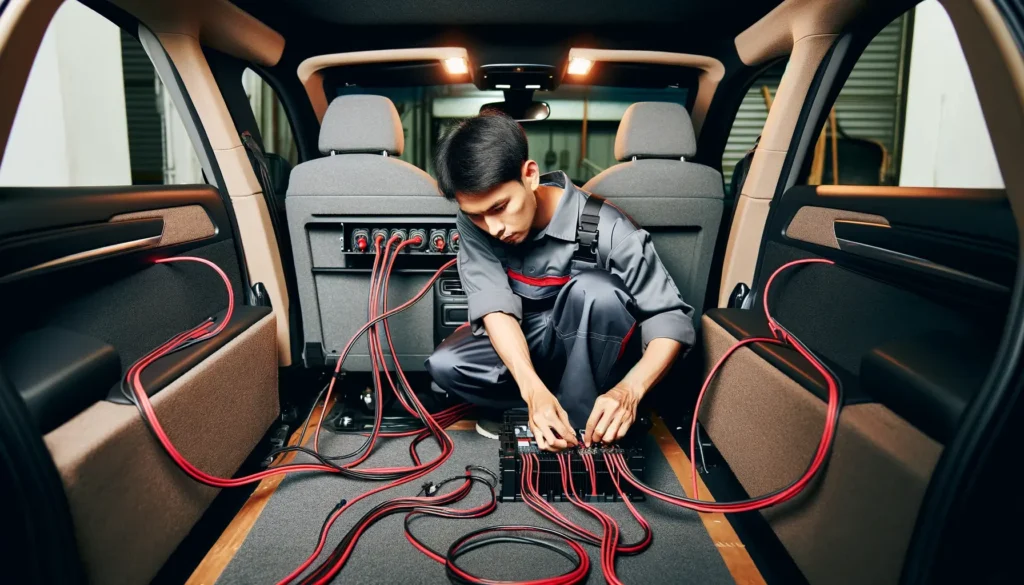
Wiring might sound like a complicated puzzle, but I promise it’s more like connecting the dots in a coloring book. We’ll take it step by step, so you’ll see how each wire connects your car’s heart to your brand-new subwoofer, bringing it to life with music.
Running the Power Cable: Like Laying Down Railroad Tracks
First, we will lay down the tracks for the music to travel. The power cable is like a train track that brings energy from your car’s battery to the subwoofer.
Start at the battery, but remember, we’ve already disconnected it for safety, right? Now, we’ll run the cable through a hole in the car’s firewall—this is usually near the steering column. If there isn’t a hole, you may need to drill one, but be careful not to hit anything important!
Once you get the cable through to the inside of your car, please keep it away from areas that get hot or have moving parts. Run it under the carpet or along the side panels until you reach the spot where your subwoofer will live.
Connecting the Beat: Turn-On Wires and Signal Cables
Next up, we have the turn-on wire and signal cables. These are like the invitations to the power party. The turn-on wire tells your subwoofer, “Hey, it’s time to wake up and play some tunes!”
This wire connects to your car stereo’s power antenna or a remote turn-on lead. It’s usually blue, but check your stereo’s manual to be sure.
Signal cables are like music messengers. They carry the beat from your car’s stereo to your subwoofer. Connect these cables to the audio output on the back of your stereo.
If you’re using a stock stereo, you might need a line output converter. Run these cables on the opposite side of the car from the power cable to avoid a buzz or interference in your sound.
Grounding the Groove: Connecting the Ground Wire
Last but not least, let’s talk about the ground wire. This one is all about safety and keeping your sound clean. You want to connect the ground wire to a spot in your car that’s connected to the body of the car.
A good ground point is usually a bolt or screw that touches the car’s metal frame. Make sure it’s clean and rust-free; you might need to scrape away a bit of paint. A solid ground connection keeps your tunes clear and prevents scary electrical problems.
So there you have it—you’ve laid down all the wiring tracks. You’ve sent out the power invitation, and you’ve grounded the party. With all the connections, your subwoofer is nearly ready to fill your car with booming bass. Great job!
Subwoofer Installation

Mounting your subwoofer is like finding the perfect spot for a new plant in your home. You want it to thrive and be secure, not wobble around. Here’s how we can get your subwoofer settled in nicely.
Securing Your Sub: The Physical Mount
First things first, let’s get your subwoofer into its new home. If you’ve chosen the trunk, which is a popular spot, you’ll want to set the subwoofer down on the trunk’s floor.
Now, some subwoofers come with brackets or mounting feet. If yours does, great! That’s like having a built-in stand. Line up these brackets with the spot where you want your subwoofer to live, and mark those spots with a pencil.
Before drilling holes, let’s pause and think about what’s under the carpet. We don’t want to drill into important car parts or wires, so take a peek underneath to be sure we’re clear.
Once we know we’re good, it’s time to drill. Place the subwoofer back, line up the holes, and secure it with screws. If you’re not using screws, industrial-strength Velcro is also a good call—it’s like using super-strong stickers that can handle the beat.
Making Sure It Stays Put: Securing for Optimal Performance
Now, a well-secured subwoofer doesn’t just stay put; it also sounds better. Why? Because when your subwoofer isn’t bouncing around, all the sound goes right where it should—into your ears, not lost in vibrations. Here are some quick tips:
- Add some rubber or foam padding under your subwoofer if it will be against a hard surface. This is like putting little cushions on the feet of a chair to keep it from scratching the floor.
- Ensure all screws are tightened nicely but not too tight—you don’t want to strip them. It’s like tightening the lid on a jar of cookies; just tight enough to keep them fresh but not so tight you can’t open it later.
- Check your subwoofer after the first few drives. Sometimes, things can shake loose when you’re jamming to your favorite tunes. It’s like checking your backpack straps before you run to catch the bus.
With these steps, your subwoofer should be snug as a bug in a rug, ready to deliver those deep bass notes that make music come alive. You’ve done a top-notch job securing it for all the adventures ahead.
Making Wiring Connections

Think of your powered subwoofer as a giant puzzle. Each piece, or wire, has a special spot. When every piece fits snugly, the picture, or in this case, the sound, comes to life beautifully.
Connecting the Dots
We’ve got our power cable, turn-on wire, and signal cables laid out. It’s time to make the magic happen. Let’s connect them to your subwoofer:
- Power Cable: This big guy connects to the “+” terminal on your subwoofer. It’s often a set screw where you’ll slide in the wire and tighten it. Ensure it’s snug, but don’t go Hulk on it—we want it tight but not squished.
- Ground Wire: This one finds a home at the “-” terminal on your subwoofer, next to the power cable. It’s the same deal here—get it tight, but treat it nice.
- Turn-On Wire: Your subwoofer has a special spot for this little wire. It might say “REM” or “Remote” on it. Connect it up, and it’ll tell your subwoofer, “Hey buddy, it’s showtime!” when you start the car.
- Signal Cables: These are your music messengers. They’ll connect to the input terminals. If they’re RCA plugs, they’ll just push right in—click, and they’re home.
If Things Get Fuzzy: Troubleshooting Tips
Sometimes, even when you’ve connected everything, things can sound a bit off. Don’t worry, you got this! Here’s what you can do:
- Check Your Connections: If there’s no sound, peek at all your connections. Make sure each one is secure and in the right place. It’s like making sure your shoelaces are tied before you go for a run.
- Look for Loose Ends: A wire that’s come loose can cause all sorts of quirky sounds or even no sound. If something’s hanging, snug it up!
- Inspect for Damage: If a wire got pinched or the insulation stripped off somewhere, it could be causing trouble. It’s like checking for a snag in your sweater that might make a hole later.
- Test the Ground: A poor ground connection can make for a fuzzy or weak sound. Double-check that your ground wire is attached to a clean, bare metal spot.
- Avoid Mix-ups: Signal and power wires should run separately to avoid any buzzing or interference—keep them away from each other like cats and dogs.
- Fiddle with the Settings: Sometimes, it’s not the wires but the settings on your car stereo or subwoofer. Play with those knobs and buttons. You might just find the sweet spot.
By following these steps, you’ll have all your wires appropriately connected, and in case something isn’t quite right, these tips should help you troubleshoot without breaking a sweat. You’re on your way to that perfect bass that makes your heart feel the beat.
Testing and Adjustments

Have you got your subwoofer all setup? Great job! Now, it’s time to test and tweak it until it sounds like you’re at a concert. Here we go!
The Big Moment: Testing Your Subwoofer
- Power Up: Start your car and turn on your music system. Start with the volume low – we’re not waking up the neighbors just yet!
- Play Some Tunes: Choose a song you know well, one with deep bass so you can hear the subwoofer do its thing.
- Listen Closely: Hear that? The bass should sound deep and clear, unlike in a bubble. If it’s more “blub blub” than “boom boom,” we’ve got some adjusting to do.
Finding That Sweet Spot: Adjustments
- Volume Levels: Let’s turn the subwoofer volume up a bit. We’re looking for a balance where the bass feels part of the music, not crashing the party.
- Crossover Settings: This fancy word means deciding which low sounds go to the subwoofer. Play with this setting to ensure your subwoofer and car speakers dance to the same tune.
- Phase Control: If the bass feels behind the beat, flipping the phase switch can pull it back into step with the music.
- Fine-tuning: Every car and every ear is different. Play with all the settings – bass boost, frequency knobs, whatever your system has. Twiddle those dials until it sounds just right to you.
If you’ve done all this and the music makes you want to move, you’ve nailed it. If things still sound off, don’t worry – it can take a bit of back-and-forth to get everything perfect. And remember, there’s no rush. Take your time to enjoy and fine-tune your new sound system until it’s music to your ears.
Benefits of Adding a Powered Subwoofer in the Car:

Imagine you’re watching your favorite movie without sound effects – not much fun, right? That’s your car without a powered subwoofer! Here’s why adding one is like giving your car’s audio a superhero cape:
The “Feel the Beat” Experience
- The Vibe: With a powered subwoofer, you’re not just listening to music; you’re feeling it. When that bass hits, it’s like a heartbeat for your tunes.
- Full Sounds: Have you ever noticed how music on just regular car speakers can seem thin? A subwoofer fills in those missing bass notes, making everything sound whole and rich.
The Ultimate Movie Star
- Drive-in Theater: Podcasts and audiobooks sound clear, but imagine watching a car chase in a movie on your in-car entertainment system. With a subwoofer, you’re right there in the action!
Custom Sound Setting
- Your Sound, Your Way: Love jazz? Crank the bass down. All about that electronic life? Turn that bass up. You get to tweak the sound exactly how you like it.
Friends in Awe
- Impress the Crew: Friends will jump into your car and won’t want to leave. You’ll be the go-to for road trips because your car sounds like a live concert.
And let’s not forget a good subwoofer can add value to your car. It’s like choosing a cherry for your ice cream sundae – it makes everything better.
FAQs: How to Install Powered Subwoofer in Car
How do you hook up a powered subwoofer?
To hook up a powered subwoofer in your car, connect the subwoofer’s power cable to the car battery, plug in the signal cable to your car’s stereo, and connect the ground wire to a metal part of the car’s frame to avoid electrical noise.
Where do you connect a powered subwoofer?
You connect a powered subwoofer to your car’s audio system. The power cable goes to the car’s battery, the signal cable to the stereo or amplifier, and the ground cable to a clean, metal part of the car’s chassis.
Is it easy to install subwoofer in car?
The ease of installing a subwoofer in a car depends on your comfort with car audio systems and DIY projects. For some, it’s a simple weekend project, while others might find it more complex and opt for professional installation.
Conclusion On How to Install Powered Subwoofer in Car
In wrapping up our journey on How to Install Powered Subwoofer in Car, let’s recap the essential steps:
- We discussed the materials and tools you’ll need, followed by pre-installation safety measures and finding the perfect spot for your subwoofer.
- We delved into the crucial wiring and connections, ensuring all the pieces fit snugly. Afterward, we walked through the physical installation and securing your subwoofer for optimal performance.
- We explored the testing and adjustments, fine-tuning your audio until it’s right.
But it’s not just about the steps; it’s about the fantastic benefits you’ll reap from this adventure. You’ll feel the music like never before, turning your car into a concert hall on wheels. Your favorite songs will come to life, and every drive will be a cinematic experience.
So, take the plunge, follow these steps, and embark on your audio enhancement journey. With your newly installed powered subwoofer, you’re in for an audio treat. Enjoy the ride and the beats that make it unforgettable!