

Have you ever thought about elevating your car’s audio experience without compromising on space? Well, say hello to the under-seat subwoofer – your go-to solution for powerful bass that doesn’t clutter your ride. If you’re anything like me, you know that music is more than just background noise; it’s an essential part of every drive.
That’s why I’m thrilled to guide you through How to Install Under-Seat Subwoofer in Your Car. With the right tools and a bit of patience, you can transform your journeys with a sound that truly resonates.
Whether you’re a DIY newbie or a seasoned pro, this article promises to make the process straightforward and rewarding. So, buckle up and prepare to amp up your audio game as we dive into the nuts and bolts of a perfect under-seat subwoofer installation.
How to Install Under Seat Subwoofer in Car?
Tools and Materials
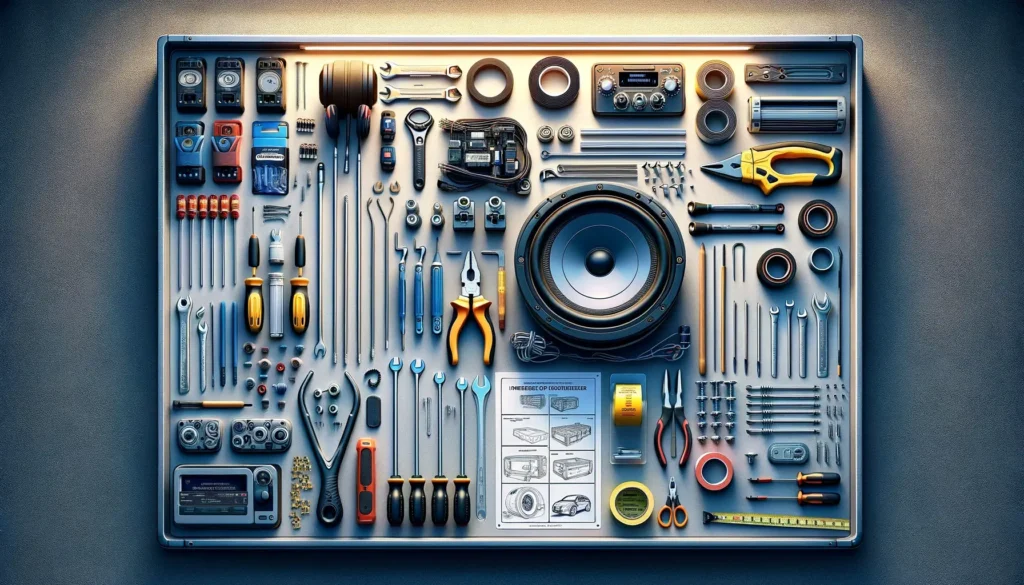
Embarking on the adventure of installing an under-seat subwoofer in your car is like setting up a tent for the first time; you need to make sure you’ve got all the right tools and materials before you start.
So, let’s make a little checklist together to ensure we have everything we need. Remember, being prepared is half the battle won!
- Under-Seat Subwoofer Kit: This is the star of the show – the compact yet powerful subwoofer designed to fit snugly under your seat.
- Screwdriver Set: Like a wizard needs a wand, you’ll need these to work the magic of installation. Phillips and flathead screwdrivers are your go-to tools here.
- Wire Cutter/Stripper: These are for cutting and peeling the ‘skin’ off wires so you can connect them without a hitch.
- Wiring Harness: Consider this as the bridge that connects your subwoofer to your car’s power and audio system without any messy wire splicing.
- Crimping Tool: It’s like a little press for your wires and connectors – a must-have for secure connections.
- Cable Ties: These are tiny lassos to keep your wires tidy and in place, avoiding any unruly tangles.
- Velcro Strips: These are the secret to keeping your subwoofer stable under the seat, preventing it from turning into a rolling nuisance.
- Line-Out Converter: If your car stereo doesn’t have subwoofer outputs, this handy device will be your mediator, ensuring the subwoofer gets the right audio signals.
- Power Kit: Your subwoofer needs juice to kick out the jams, and this kit usually includes a power cable, ground cable, fuse holder, and turn-on lead.
- User Manual: Last but not least, your subwoofer’s manual is like a treasure map – it shows you the ins and outs of your particular model.
With this toolkit, you’re well on your way to boosting your bass and enjoying every beat on the road. Each item here has been picked to make sure that when you say, “Let’s do this,” you’ll have everything you need to get the job done smoothly.
Pre-Installation Preparation

Before we jump into the world of wires and sounds, let’s chat about getting your car ready. Think of it like prepping for a fun paint job; you want everything clean and in order, before you start. Here’s how we can prepare for a smooth installation:
- Clean Your Workspace: Make sure the area under the seat is clean. No one wants to work in a messy space, right? Plus, it’s safer that way.
- Car Battery: Just like you switch off your toys when fixing them, you need to disconnect your car’s battery. This is super important to keep you safe from electric shocks.
- Seat Adjustment: Move your seat back and forth to find out how much space you’ve got. This way, you’ll know the best spot to place your subwoofer.
- Measure Twice: Just like when you help out with a bit of DIY at home, measure the area under your seat to make sure the subwoofer will fit like a glove.
- Safety First: Wear protective gloves if possible because you will be handling wires and tools. Better safe than sorry!
- Check the Subwoofer: Take a peek at your new buddy, the subwoofer. Make sure it’s in tip-top shape and has no dents or scratches.
- Read the Instructions: Every subwoofer is a little different like every puzzle has its pieces. Read the manual that came with your subwoofer to get to know it better.
By following these simple steps, you’re setting the stage for a successful under-seat subwoofer installation. It’s all about making sure we’re safe and ready to go. So, grab your tools, and let’s get this show on the road!
Step-by-Step Installation
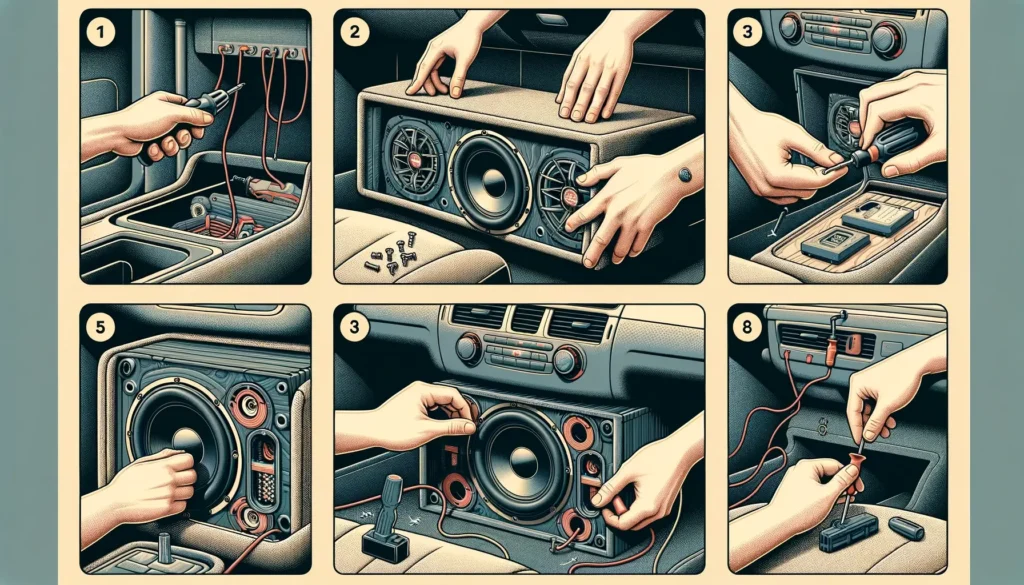
Alright, it’s game time! We’re about to roll up our sleeves and get down to the nitty-gritty of how to install an under-seat subwoofer in your car. Don’t worry; I’ll walk you through each step so you can follow without guesswork. Here’s how we do it:
- Find the Perfect Spot: Slide your seat back and place the subwoofer under the seat to ensure it fits nicely. You want it to be snug, not squished!
- Secure the Subwoofer: Use the Velcro strips to stick the subwoofer to the car floor. This helps it stay put, so it won’t dance around while you drive.
- Connect to Power: Locate the car’s fuse box and run the power cable from the subwoofer to it. Be sure to follow the safe path from moving parts under the seat.
- Ground It: Find a spot for the ground wire. A good ground point is usually a bolt or screw that touches the car’s metal body. Make sure it’s clean and rust-free.
- Wire Up the Audio: Now, let’s get the music flowing. Connect the audio cables from the subwoofer to your car stereo. If your stereo doesn’t have a direct subwoofer output, this is where the line-out converter comes in handy.
- Tidy Up: With all the wires connected, bundle them up neatly with cable ties. This keeps your space clean and prevents wires from getting tangled or damaged.
- Reconnect the Battery: Now that everything’s hooked up, reconnect your car’s battery. This is like giving the green light to your subwoofer to start working.
- Test It Out: Turn on your car and play some music. Listen to the sounds and feel the bass. It should sound clear and robust, unlike it’s struggling or muffled.
- Adjust the Seat: Finally, adjust your seat back into your preferred position, ensuring it doesn’t press down on the subwoofer or the wires.
And there you have it! You’ve just installed your under-seat subwoofer. Give yourself a pat on the back for a job well done. Remember, if this guide talks about steps and parts you’re not seeing, check your subwoofer’s manual. It’s the instruction book written just for your model.
Wiring and Connections

Now, let’s chat about how we can make friends between your new subwoofer and your car’s audio system. Good connections improve everything, like holding your friend’s hand to play a game. Here’s how you can make that magic happen:
- Right Wires in Right Places: Your subwoofer comes with many wires. We’ve got power wires, ground wires, and audio input wires. They’re like the roads that connect your subwoofer to your car. We need to make sure each wire goes to the right place.
- Power Wire: This one is usually red, and it’s the subwoofer’s energy drink. Connect this wire to your car’s fuse box. It’s like plugging in a night light; it needs power to glow, or in this case, for the subwoofer to boom.
- Ground Wire: It’s usually black, and it keeps things safe. Connect it to a metal part of your car’s frame, like a bolt or a touching metal screw. This stops any naughty sparks.
- Audio Wires: These are the storytellers. They tell your subwoofer what sounds to make. Connect them from the audio output of your car stereo to the input on your subwoofer. If your stereo doesn’t have a particular output for subwoofers, you might use a converter.
- Remote Wire: Some subwoofers have a remote wire. It’s like a messenger that tells the subwoofer when the car stereo is on. Connect this wire to the stereo’s remote turn-on wire.
- Check Connections: After you connect the wires, give them a gentle tug to make sure they’re snug and won’t come loose when you’re driving.
The right connections make sure your subwoofer works well and sounds great. It’s a big deal because if wires are mixed up, your subwoofer might not talk to your stereo correctly. Think of it like this: if you don’t plug in your video game controller correctly, it won’t work, right? Same thing here.
By taking care of your wiring and making sure each wire is snug and in the right spot, you’ll have a subwoofer that sounds amazing and brings your music to life. And guess what? You did it all by yourself. High five!
Testing and Fine-Tuning

Yay! You’ve installed your under-seat subwoofer, but before you hit the road, let’s ensure it’s working just right and the tunes are tuned to your liking. Here’s how you can test and tweak the sound:
- The First Test: Turn on your car stereo and play a song with a good bass line – something that gets your foot tapping. You should feel the bass under your seat like a gentle thump, thump, thump.
- Listen Carefully: Can you hear the bass clearly? Is it too loud or too soft? We’re looking for that sweet spot where it sounds part of the music, not trying to steal the show.
- Adjust the Volume: If the bass is too strong or weak, reach for the subwoofer’s volume control. Turn it up or down, just like how you adjust the volume on your TV until it sounds just right.
- Tweak the Frequency: A little knob or a slider on your subwoofer called ‘frequency.’ This decides what type of bass sounds come out. Play with this knob until the bass sounds smooth and not too ‘boomy.’
- Balance It Out: Now, let’s ensure the bass isn’t only loud under your seat. It should be even in the whole car. If your subwoofer has a ‘phase control,’ it helps. Switch it back and forth until the bass feels right in all seats.
- Fine-Tune the Sound: Some subwoofers have fancy settings like ‘bass boost’ or a remote control. Use these to adjust the bass without having to stretch under the seat.
- Final Check: Once you think you’ve got it, step out of the car for a minute, then come back and listen. Sometimes, a little break helps our ears to hear better.
Now, pat yourself on the back! You didn’t just install a subwoofer; you made it sing beautifully. If you feel the sound isn’t quite perfect, don’t worry. You can always tweak it again until you love what you hear. After all, we want your music to be a joy, not a job!
Troubleshooting Common Problems

Oh no, did something go a bit wonky with your under-seat subwoofer install? Don’t you worry! We’ve all been there. Here are some common oopsies you might run into and how you can fix them:
- The Silent Treatment: If your subwoofer isn’t making any sound, check that the power wire is firmly plugged into the fuse box and the ground wire is attached to a clean, metal part of the car. Also, peek at the audio wires to ensure they’re appropriately connected to your stereo.
- The Rumble Grumble: Hearing weird noises or vibrations? Make sure the subwoofer is secured tightly under the seat. If it’s loose, it can dance around and make rattling sounds.
- The Buzzing Bee: A buzzing sound can mean the ground wire isn’t connected well. Find a better spot on the car’s metal frame and ensure it’s snugly attached.
- The Weak Bass: If the bass is too soft, check the settings on your car stereo and subwoofer. You might need to turn up the subwoofer level or adjust the frequency.
- The Power Nap: If the subwoofer turns off suddenly, it might take a power nap because the power wire isn’t connected right or the fuse blows. Double-check that wire and maybe replace the fuse, just like changing batteries in a toy.
- The One-Side Wonder: If sound is only coming out on one side, likely that one of your audio input wires isn’t connected right. Give those wires another look.
Remember, if you’ve tried these fixes and your subwoofer still isn’t happy, it’s okay to ask for help. Maybe a friend who’s good with gadgets or a professional who knows about car audio can lend a hand. Fixing problems is like solving a puzzle, and it feels fantastic when everything fits just right!
Maintenance and Care

Keeping your under-seat subwoofer in tip-top shape is like caring for a pet – it needs a little love and attention to be its best! Here’s what you can do to keep the beats bumping and your subwoofer smiling:
- Keep it Clean: Dust and dirt can be sneaky, and they love to cuddle up with your subwoofer. Use a soft cloth to wipe the surface of the subwoofer gently. For those hard-to-reach spots, a can of compressed air can be your best pal – it blows away the dust bunnies without a fuss.
- Stay Cool: Subwoofers can get warm with all that jamming. Ensure it has enough space to breathe so it doesn’t get too hot. It’s like ensuring you don’t cover your little buddy with a blanket on a sunny day.
- Secure Connections: Every once in a while, check the wires to ensure they’re snug and not frayed. Loose or damaged wires can make your subwoofer sound sad or even be silent!
- Protect from Spills: Water and electronics are not friends. If you’re sipping a juice box or a water bottle in the car, ensure the cap is on tight. Spills near your subwoofer can cause a big uh-oh.
- Regular Check-Ups: Like visiting a doctor, give your subwoofer regular check-ups. Listen for any odd sounds or changes in performance. Catching a little hiccup early can stop it from becoming a big burp.
- Avoid the Heavy Stuff: Don’t put heavy things on top of or right against the subwoofer. It’s tough, but heavy pressure can hurt its feelings and ability to boom and vroom.
By treating your under-seat subwoofer nicely and keeping it clean and cozy, you’ll make sure it keeps adding that excellent bass to your road trips and sing-alongs. A well-cared-for subwoofer means more fun, music, and beats to make you happy on the go!
FAQs
Can you put a subwoofer under a car seat?
Yes, you can! Under-seat subwoofers are designed to fit snugly under a car seat, saving space and providing superb sound.
Where is the best place to put a subwoofer in a car?
The best place often depends on your car and preferences, but generally, the trunk or under the front seats are popular spots for good bass and space efficiency.
Can I just add a subwoofer to my car?
Absolutely! You can add a subwoofer to your existing car audio system for better bass. You may need an amplifier and the correct wiring, but it’s a common upgrade.
Can I connect a subwoofer to a car stereo?
Yes, you can connect a subwoofer to your car stereo directly if it has a dedicated subwoofer output, or you may use an amplifier to ensure proper power and quality.
Is a subwoofer necessary for a car?
It’s unnecessary, but if you love deep bass and rich sound in your music, a subwoofer can make a huge difference in your listening experience in the car.
Conclusion
Alright, friends, we’ve zoomed through How to Install Under Seat Subwoofer in Car together! Remember, it’s all about finding the right spot, getting those tools and materials ready, prepping your car safely, and following the installation steps individually.
Make sure the wiring is spot on, then test out the sounds and fine-tune them to get that perfect thump of bass that makes your heart skip a beat!
I’m cheering for you! Go ahead, give it a go, and see how you can transform your car rides with some booming bass under your seat. It’s a bit like building a fantastic Lego set – follow the steps, enjoy the process, and bask in the glory of your creation.
Have you got questions? Want to share your installation adventure or the sweet sound success you’ve achieved? Drop your comments below – let’s chat! Your thoughts and stories could be just the nudge someone else needs to start their subwoofer journey.
Remember, whether it’s your first time or you’re a seasoned sound system enthusiast, we’re all on this tune-filled ride together. Let’s make every car journey sound amazing!